Modern phone imaging has moved far beyond quick, grainy snaps. Today, a thoughtful approach to light and tone can lift an image into gallery territory.
Artbeat Studios printed a camping scene shot on a phone, proving careful technique yields true, gallery-grade results.
This short guide collects field-tested methods for low light work. You will learn what to set, how to steady your camera, and when to trust computational tricks.
We will show how to adjust highlights and shadows separately so a scene gains depth and purpose. Small moves to exposure and selective edits can make images feel intentional rather than accidental.
Understanding the Physics of Low-Light Photography
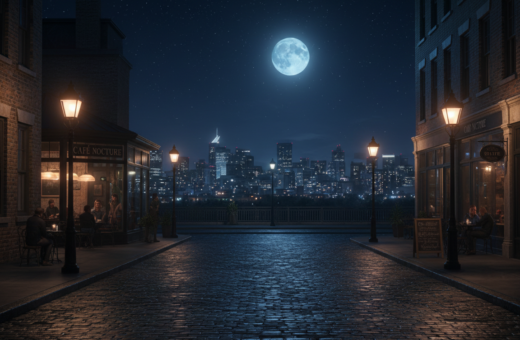
Low-light scenes force us to reckon with what the camera can and cannot capture. Shooting after dusk is about the amount and quality of light hitting the sensor. Kote Puerto’s Unsplash shot is a good example of those limits in real conditions.
The Challenge of Dynamic Range
Sensors must trade between exposure time and gain. To gather more light a phone can use longer exposures or raise ISO, but both bring risks: motion blur or increased noise. Computational frame blending helps by merging multiple images, yet it cannot fully erase physics-driven artifacts.
Managing Color Temperatures
Artificial lights in urban scenes often show mixed color temperatures. That mix can fool auto white balance and make it hard to keep consistent tones in highlights and shadows.
- Longer exposures collect signal but need steadiness.
- Higher ISO brightens a photo but raises noise.
- Different scenes—urban vs. remote—demand different approaches.
Optimizing Your Smartphone Settings for Night Shoots
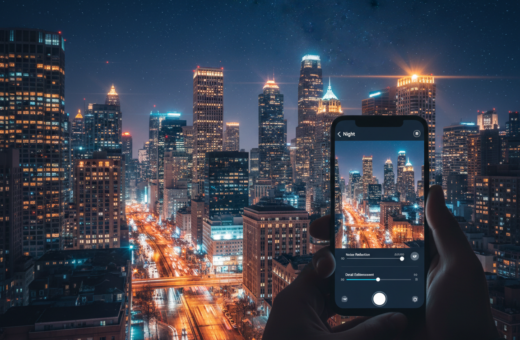
Choosing the right settings on your phone can turn dim scenes into usable images. Start by switching to RAW when available; RAW keeps shadow data and color that JPEG often discards. Shooting RAW gives you more control in post and can reduce visible noise in dark areas.
Use Night Mode selectively. Night mode stacks multiple frames to boost exposure, but it needs stability. A tripod or firm support helps the stacked frames combine cleanly and avoids blur.
Try Pro or Manual mode to set ISO and shutter speed. Lower ISO cuts noise, while a slower shutter brings more light. Balance shutter speed with movement in the frame to prevent blur.
- Prefer the primary lens for low light; its sensor usually performs best.
- Manually set white balance under tungsten or sodium lights and lock focus for long exposures.
- Keep a spare battery or use a model with long battery life—like the Samsung Galaxy S26 Ultra—to shoot for extended periods.
How to Adjust Highlights Shadows Night Photography Smartphone
Fine-tuning the darkest and brightest parts of an image makes low-light shots feel deliberate and dimensional.
Recovering Shadow Detail
Bring up shadow tones carefully. Lifting deep areas reveals texture and mood, but it also exposes noise. Work in small steps and use noise reduction sparingly.
When you edit a photo, openRAW or a raw-capable app to retain detail. Use local brushes to brighten only the parts you need.
Controlling Highlight Clipping
Pull down blown highlights to rescue sky and specular points. Reducing the brightest pixels brings back cloud and window detail without flattening the whole image.
Combine a modest reduction with selective exposure or curves. This keeps contrast while saving detail in bright zones.
- Use local edits for precise control.
- Keep ISO and shutter in mind to avoid creating new problems.
- Preview edits at 100% to check for noise and banding.
Mastering Exposure and ISO Balance
The balance between sensor gain and exposure time decides if a photo reads as crisp or noisy. This choice affects contrast, noise, and motion in each scene. Use the camera’s controls to steer that trade-off rather than relying on automatic fixes.
Balancing Shutter Speed and Noise
Keep ISO in a conservative range—typically under 400–800—so images retain texture. ISO acts like an amplifier while shutter speed collects light. Let the shutter run longer when the scene and subjects allow it.
When bright points risk clipping, slightly underexpose to protect those areas. You can lift dark tones later with less penalty.
- Use stabilization or choose static elements to avoid blur when extending exposure time.
- For motion, prioritize a faster shutter and accept higher ISO, or use slow shutter intentionally for light trails.
- Decide the visual result up front: prioritize shutter speed for freeze, or exposure time for clean, low-noise images.
Essential Stabilization Techniques for Sharp Images
Steady support is the single most reliable upgrade for cleaner low-light shots. Use a firm base and you will see crisper images with less noise and blur.
A small tripod or phone mount instantly improves sharpness. It lets you use longer shutter speeds and lower ISO without camera shake.
Evgeniya Pron’s work on Unsplash shows how stability transforms a casual frame into a polished photo. Her shots prove that steady gear yields professional-looking results.
- Carry a compact tripod to unlock long exposures and smooth motion effects.
- Improvise with rocks, railings, or a backpack when a tripod is not available to prevent shake.
- Use a self-timer, volume-button shutter, or remote release to avoid tap-induced vibration.
- Remember that multi-frame mode requires steady input—follow any on-screen steadiness prompts.
- Stabilization also helps creative long exposures like star trails or silky water become readable and intentional.
Keep focus and composition steady and the camera will capture more detail. Good support is the easiest way to improve your night photography and make images that stand up to close inspection.
Creative Use of Ambient and Artificial Light
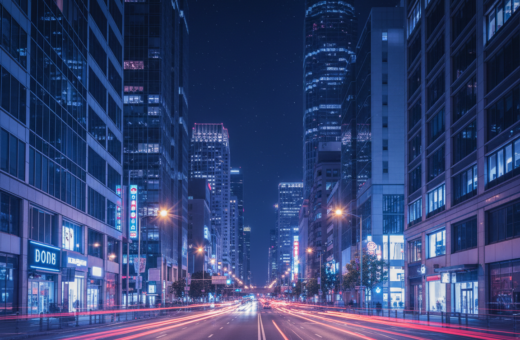
Light is an active element in any image; use it to shape depth and mood. Place subjects so street lamps, neon, or club fixtures create separation from the background. Small moves in position change contrast and focus quickly.
Sculpting with Street Lights
Street lamps and signs act like studio fixtures. Move a person a few feet forward or back to make a rim or key light. Christian Holzinger’s Unsplash work shows how urban lights carve form and give a raw, cinematic feel.
Utilizing Reflections
Reflections amplify available light. Lower your viewpoint near puddles, glass, or wet pavement to capture doubled sources and richer color. This adds depth without extra gear.
Light Painting Techniques
Light painting is ideal for selective illumination during a long shutter exposure. Use a small flashlight or headlamp to brighten a foreground object. DJ Miamor uses this on the fly to get shareable content while she performs.
- Position people relative to lamps to create layers.
- Use reflections to boost contrast and color with a low angle.
- Try a short light-paint pass to reveal texture in the foreground.
Advanced Editing Strategies for Depth and Texture
Smart local fixes help preserve atmosphere while bringing out hidden detail. Begin every edit by targeting noise reduction. Apply it mainly in deep areas so texture in bright zones stays crisp.
Correct white balance with care. Use local tools to tame strong color casts from street or tungsten light. This keeps mood without draining color.
Raise darker regions to reveal detail, but resist flattening contrast. Keep edges and specular points sharp so the image retains depth and structure.
- Use graduated filters to control sky-to-ground transitions.
- Apply radial clarity boosts on faces or key textures.
- Selective sharpening on edges preserves perceived detail while avoiding noise amplification.
Export at high quality — choose TIFF or a max-resolution JPEG for prints. Verify the result on a calibrated screen to ensure color and contrast match your intent.
Avoiding Common Night Photography Pitfalls
Many disappointing images come from trusting automatic modes without checking key settings.
Don’t rely on full auto. Auto mode can blow highlights or add heavy processing that masks real detail. Learn to lock exposure or use manual controls so you can save difficult scenes.
Use the main camera lens for low light. Ultra-wide and digital zoom often produce noisier pictures after dark, so favor the sensor that gives cleaner results.
Be conservative with edits. Extreme sharpening or oversaturated tones create halos and fake color that print poorly. Apply modest noise reduction and test results at full screen and 100% zoom.
Mind your surroundings. Finn’s work on Unsplash reminds us that ledges and slick surfaces can be hazardous. Bring a headlamp, plan setups, and avoid risky positions.
Preventing Over-Processing Artifacts
Keep edits subtle and use local tools for problem areas. Lock exposure, reduce ISO where possible, and check for banding or color shifts on a calibrated screen.
- Prefer the primary lens and steady support to cut noise and shake.
- Lock exposure or reduce ISO to prevent blown lights and lost shadow detail.
- Limit aggressive sharpening and saturation to avoid unnatural results in prints.
The Role of Printing in Evaluating Your Work
Watching a small digital file become a large print teaches you more about tone and noise than any screen can.
Billy Xue’s printed work and Francisco de Frias’s examples show phone captures can reach professional quality when handled right. A single print reveals grain, color casts, and detail that a small screen hides.
Prints force honest decisions. Shoot RAW, control your camera settings, and apply careful editing so noise reduction and color match your intent.
Invest in a good printer or a reputable lab and learn basic color management. Soft-proofing on a calibrated screen helps you predict print results and avoid surprises.
- Turn a well-shot phone image into a physical object to judge detail and contrast.
- Use a lab for large prints if you need consistent color and material choices.
- Evaluate which mode, shutter, and settings produced the best pictures for your portfolio.
Printing clarifies what works in low light and what people actually see on paper. It’s the most reliable way to improve your craft and present lasting results.
Conclusion
Good low-light work starts with patient choices rather than gear upgrades. Focus on light, steady support, and deliberate exposure decisions to get the most from each frame.
Practice exposure control and careful editing to bring out depth and texture. Learn to use the shutter and bracketing to capture scenes with range and intent.
Value one well-made image over many quick attempts. Try light painting, print your favorites, and compare results in hand to refine your process.
With patience and simple routines, the night becomes a toolkit. Your phone can produce images that matter when you shoot with purpose.