Mixed light can ruin a great photo fast. Chuck Place found that when he shot the Melville Winery barrel room, sodium vapor lamps gave a green cast. The same camera later tried to neutralize warm incandescent glow at La Arcada Plaza.
Auto white balance often misreads scenes with mercury vapor, fluorescent, or sodium lamps. Cameras and phone sensors report color differently than our eyes. That leads to odd tones in altar shots and holiday scenes.
Pro photographers solve this with manual settings and targeted editing. Tools like Adobe Lightroom Classic let you fix local shifts that the camera missed. Understanding how daylight and indoor light sources mix is the first step to better results.
This guide shows how to use on‑device tools and post‑processing to get truer color and cleaner photos in tough lighting situations.
Understanding Why Night Lighting Confuses Smartphone Sensors
Mixed lamps force a camera to pick one tone when a scene contains many. Different bulbs and street lamps create overlapping hues that sensors must interpret quickly. Kote Puerto notes that shooting after dark is about both the quantity and quality of available light.
The Impact of Artificial Light Sources
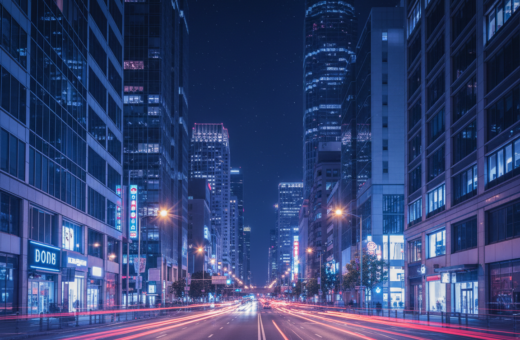
Tungsten and sodium-vapor lamps are frequent culprits. These sources shift the color cast across a frame and make accurate rendering difficult.
When daylight mixes with neon or street lamps, the scene can show warm and cool patches at once. That complexity leads to inconsistent results in many photos.
Why Auto White Balance Fails
Auto systems assume the scene has one dominant tone. In real-world situations, that rarely holds true after sunset.
Phones must also trade longer exposures for motion blur. That limits how much light the sensor can gather, so the auto white setting often guesses and misses the target.
“By analyzing the scene before you shoot, you can predict when the auto white will fail and choose a better approach.”
- Check dominant light sources and plan adjustments.
- Expect mixed tones from street lamps, neon signs, and indoor bulbs.
- Use manual tools when the camera’s auto mode struggles to deliver natural results.
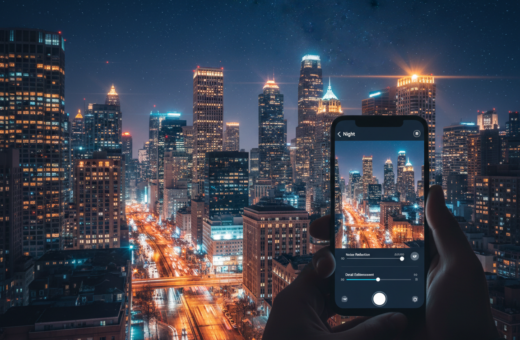
Mastering White Balance Night Photography Smartphone Correction
Taking control of your camera’s color settings transforms how evening scenes render on-screen. Learn to set white balance for varied lighting conditions so your images match the scene you saw.
Control matters more than relying on auto. Use live presets or manual sliders on your phone to set white balance before you shoot. That reduces heavy editing later and preserves true color under street lamps and mixed bulbs.
Apps like Lightroom give precise options: temperature, tint, and the eyedropper tool. Professionals often use the eyedropper to lock neutral tones so skin and fabrics look natural.
“Adjust exposure and color on location — it saves time and keeps the final image more faithful.”
- Set white live when possible instead of fixing everything in editing.
- Override auto white balance when tones look off.
- Use phone editing tools to fine-tune color and keep highlights accurate.
Optimizing Camera Settings for Low Light Environments
Set sensible exposure and lock focus before you press the shutter to avoid guesswork in low light. That upfront effort reduces noise and keeps colors truer to the scene.
Use ISO 400–800 on your phone or camera to retain detail while limiting grain. Combine that with a fixed exposure and locked focus to prevent the system from hunting in low light.
Stabilization Techniques for Sharp Images
Stabilization is critical when you need longer exposures. A tripod lets you stretch exposure time without raising ISO.
If you lack a tripod, brace the phone on a ledge or bag. Use a self-timer or remote shutter to remove tap shake and get the sharpest photos.
- Keep ISO between 400 and 800 for clean results.
- Lock exposure and focus in manual or pro mode before capture.
- Use a tripod or solid rest and a timer to prevent blur.
“A stable setup and deliberate settings often beat faster shooting in low light.”
Manual Adjustments for Precise Color Control
Manual controls let you match your camera’s response to the exact light on scene. Use on-device tools when auto systems misread mixed sources. Small, deliberate changes save time and deliver truer color in challenging lighting.
Using Pro Mode on Android
Pro mode gives direct access to white balance and exposure sliders. Dial temperature and tint to neutralize dominant bulbs. Lock exposure after you set the white point to prevent the camera from shifting tones mid‑shot.
Leveraging Lightroom Mobile for iPhone
Lightroom Mobile lets you set a custom white point with an eyedropper on a neutral surface. That option fixes stubborn color casts and keeps skin tones natural. Use it when in-camera options can’t remove mixed light casts.
Setting Custom White Points
Setting a custom point is often the most reliable method in tungsten or mixed light situations. Pros routinely set a target while shooting to ensure every photo remains faithful to the scene.
“When you set white manually, the job of true color rendering becomes predictable.”
- Use Pro mode to control white balance and exposure on Android cameras.
- Use Lightroom’s eyedropper on iPhone to set a precise custom point.
- Manual settings beat auto when multiple light sources confuse the camera.
Post-Processing Techniques for Natural Results
Post-processing lets you rescue color and mood after a challenging shoot. Start by setting a reliable white balance on the raw file and then refine local areas that still show strong casts.
Use local adjustments to target lamps, sky, or skin tones without draining the scene of atmosphere. Apply selective noise reduction to shadows only, so highlights keep texture and detail.
Artbeat Studios proved this approach worked: a camping photo they printed scored 29/30 for color and detail. That showed a phone capture could reach gallery-grade results with careful edits.
“Careful white balance correction in post-processing can turn a mediocre phone photo into a gallery-grade piece of art.”
- Correct white balance first, then tweak exposure and color globally.
- Use local brushes in Lightroom to tame a strong light cast.
- Export a high-quality TIFF or JPEG for print or sharing to keep the best results.
Conclusion
A few deliberate settings will change how your phone records dim, mixed light.
Learn manual white balance on your camera and use an eyedropper or preset to set color quickly. Small fixes before capture reduce heavy editing later.
Practice stabilizing shots, override auto on the phone, and refine in editing to make photos that match what you saw. These steps help skin tones and highlights read naturally.
With time and patience, your camera skills and color choices lift simple snaps into strong photography. Go shoot, test, and trust your adjustments — better results will follow.