Modern photography makes it possible to capture rich textures and mood in low light. With a few simple techniques you can turn casual snaps into gallery-grade images.
I discovered this firsthand when a camping photo I printed with Artbeat Studios scored 29/30 for quality and detail. That print proved sensors and careful handling yield professional results.
This short guide focuses on practical steps: lighting choices, steady support, and how to use night mode wisely. Follow these tips and your photos will feel intentional rather than accidental.
Understanding the Physics of Low Light Photography
When available light drops, your camera must make trade-offs that directly shape the final image. Grasping these limits helps you plan shots instead of hoping auto modes will fix problems.
The Impact of Light Quantity
In low light the sensor has two options: gather more light via longer exposures or amplify the signal with higher ISO. Both choices change the look of your photos.
Longer exposures increase sharpness risk from movement. Higher ISO brings grain and reduced color fidelity. Kote Puerto’s night scenes on Unsplash show how limited light forces these exact compromises.
Managing Dynamic Range
Artificial sources often mix warm and cool tones. That variation can confuse auto white balance and reduce apparent contrast in a scene.
- Bright signs clip easily, losing highlight detail.
- Deep shadows can hide subtle textures that make an image feel rich.
- Computational stacking helps, but it can’t conjure photons that never hit the sensor.
“Sensors must balance noise against detail in every image.”
Know these limits and you can choose light or technique to preserve detail and contrast, improving your night shots before you press the shutter.
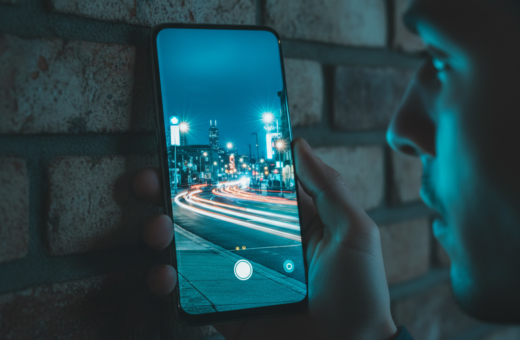
How to Prevent Motion Blur Smartphone Night Photography Handheld
You can capture crisp frames after dusk by combining steady posture, proper settings, and calm breathing.
Prioritize stability. Leaning against a wall or resting your device on a solid surface reduces camera shake more than holding it outstretched. Brace your elbows to your ribs and tuck your hands close to the body for extra support.
Use the Samsung Galaxy A16’s dedicated night mode when light is low. That mode stacks multiple exposures to lower noise and recover detail. In manual mode you can also set shutter and ISO to hold detail while keeping noise in check.
- Keep shutters fast enough to avoid camera shake; avoid a slow shutter unless supported.
- Practice mindful breathing and a gentle release of the shutter to steady each frame.
- Always check images at 100% zoom to confirm sharpness and noise reduction worked.
“A steady support and the right settings deliver usable results more often than luck.”
Remember: even with advanced computational cameras, using a tripod is the clearest way to guarantee a blur-free frame.
Mastering Your Grip for Maximum Stability
A steady, confident grip is the single most effective way to keep shots sharp in low light. How you hold the camera affects every frame, from exposure to detail. Small choices in posture and breath will reduce camera shake and improve results when light is limited.
Proper Hand Placement
Tuck your elbows into your sides to form a human tripod. This simple stance cuts lateral movement and steadies the lens during a slow shutter.
Hold the camera with both hands and keep the device close to your chest. This gives better control over the shutter and lowers the chance of a jerky press that ruins photos.
The Importance of Mindful Breathing
Breathing matters more than you think. Take a slow inhale, let it out halfway, then press the shutter. That pause reduces chest movement and helps lock the subject in frame.
Practice holding the position for a few seconds before you shoot. Every tiny movement translates into blur, so steady posture and calm breaths are essential when tripod support is unavailable.
- Grip firmness: apply steady pressure without straining your hands.
- Body alignment: feet shoulder-width apart for better balance.
- Check settings: match shutter speed and mode to ambient light and lens focal length to lower the risk of camera shake.
“Controlled breathing and a human tripod will often save a frame more reliably than luck.”
Utilizing Environmental Supports to Steady Your Device
Everyday objects can serve as reliable supports for sharper night images.
Find stable surfaces like a backpack, a low wall, or a flat rock and place your device against them. These simple steps let you hold exposures longer and gather more light without risking a soft frame.
Improvising with Everyday Objects
Use what’s nearby: a ledge, a bench, or a bag make solid anchors for the camera. Resting the device reduces shake so night mode and longer exposures work better.
Even a small, flexible tripod is handy. But learning to brace your gear against the environment makes you more adaptable on walks and at events.
- Place the phone on a flat surface for steady, sharp images.
- Brace the camera against a post or railing to cut movement.
- Angle the device so light reaches the sensor without glare.
“A stable support from the environment often turns a risky shot into a keeper.”
Result: by using surroundings and a calm method, you can capture high-quality night photo frames that rival tripod shots.
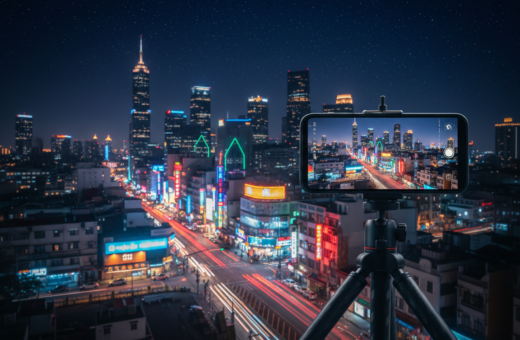
Adjusting Shutter Speed and ISO for Sharper Results
Control of shutter speed and ISO is the fastest path to sharper low-light images. Adjusting shutter speed directly governs how much light hits the sensor, so it is the primary tool for shaping a scene. Keep shutters fast enough to reduce camera shake and unwanted subject movement.
If your camera has advanced stabilization, like Olympus models with 5-axis VCM image stabilization, you can handhold at a slow shutter speed and still get sharp results. That extra compensation lets you collect more light without raising ISO too high.
Raising ISO speeds the shutter and helps freeze subjects in low light. But higher ISO brings more noise and less color detail. Balancing these settings is a constant trade-off between noise and sharpness.
“Manually controlling shutter and ISO gives you predictable, crisp images that automatic modes can’t always deliver.”
- Adjust shutter speed first to manage scene exposure.
- Use stabilization features when using a slow shutter speed.
- Increase ISO only as needed to avoid heavy noise.
Leveraging Night Mode and Computational Photography
Modern camera software can rescue low light scenes by combining many quick exposures into a single, cleaner photo.
How Multi-Frame Stacking Works
Multi-frame stacking captures several short frames over a few seconds. Algorithms align those frames and merge them to raise brightness and detail.
This reduces noise and improves sharpness without pushing ISO too high. The software rejects misaligned pixels, so minor subject motion can be handled.
“Stacking trades time for a better image when light is limited.”
When to Trust Automatic Modes
Use night mode when you need a quick, reliable result and the scene is mostly static. Good models do excellent noise reduction and exposure blending.
If you want full control of shutter speed, white balance, or lens choices, switch to manual mode or a third-party app like Camera FV-5 or ProShot. Those apps let you lock settings and fine-tune the final photos.
- Night mode: great for stationary scenes and low noise.
- Manual mode: best when you need a specific brightness or artist intent.
- Know your phone model: processing quality varies by device and software.
The Role of Manual Mode in Controlling Exposure
When you need predictable results, use manual mode to set shutter speed and ISO directly. This gives you full control of how the camera collects light and shapes the final image.
Manual mode lets you match settings to the scene. Set a shutter speed that freezes or elongates subject trails. Then raise ISO only as needed to keep noise low.
Being deliberate with settings prevents the camera from over-brightening and hiding detail. A well-exposed frame often needs less cleanup later and keeps natural texture intact.
- Choose a shutter speed to control subject rendering—fast to freeze, slow for light trails.
- Balance ISO with speed to limit noise while keeping usable exposure.
- Practice different combos so you learn how light and speed interact.
“Mastering manual mode removes guesswork and speeds your path to professional-level results.”
Creative Composition and Lighting Techniques
Think of ambient lamps and signs as compositional tools, not just illumination. Place elements so light defines form and contrast, and you will shape mood before you touch any settings.
Using available light well lets you create depth and mystery in a low light scene. Frame your subject near street lamps, windows, or neon to get hard edges and soft falloff in the same shot.
Using Ambient Light Sources
Position the subject so the brightest light outlines contours and the darker areas add contrast. This technique draws the eye and gives the scene cinematic depth.
Try a slow shutter to capture trailing lights from cars or signs. Long exposures turn moving highlights into graceful lines that add energy without cluttering the frame.
- Frame with light: use lamps and signs to lead the eye.
- Seek reflections: wet pavement and glass double light and boost interest.
- Sculpt mood: control direction and quality of light to change contrast and tone.
“When you control the light, you control the mood of the image.”
For more practical pointers on composing with limited light, see these pro tips for your best-ever night. Apply these composition approaches along with careful shutter and camera choices to create striking night scenes.
Essential Post-Processing Tips for Night Images
Careful editing tightens exposure, tames noise, and clarifies the story you saw in the scene.
Start with targeted noise reduction. Apply it to shadows first so you keep texture while cleaning heavy grain. Use a mask to protect sharp edges and fine detail.
Remember: you cannot change shutter speed in post, so get the in-camera exposure right. If highlights are clipped, recover what you can but avoid overdoing contrast.
Adjust white balance even after using night mode; small tweaks often restore natural color. Then boost contrast and local color to bring the scene to life without adding artifacts.
- Work non-destructively and save edits in a high-quality format.
- Use selective tools to reduce digital noise while preserving edges.
- Export a master file and make web copies at lower sizes for sharing.
“Good post-processing reveals the image you intended to capture.”
For further practical guidance on editing and capture technique, see a concise guide on mastering smartphone night shooting.
Conclusion: Mastering the Art of Night Photography
,
As Benedict Brain notes, night photography rewards curiosity and patience. Mastering this craft means learning your camera settings and how to balance shutter speed and ISO for crisp results in low light.
Whether you use night mode or manual mode, keep the camera steady to reduce motion blur and camera shake. Treat each scene as a blank canvas: control lighting, composition, and contrast to shape the final image.
Practice these techniques regularly. In a few sessions you will see better photos, improved noise reduction, and steadier frames that rival tripod shots.