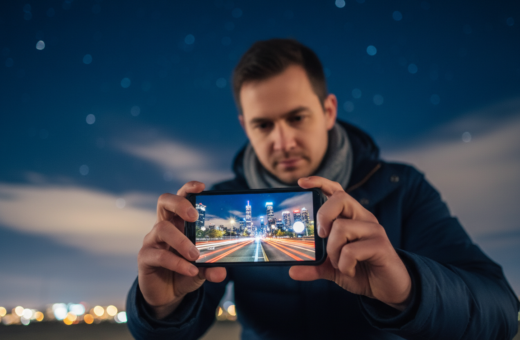
Smartphone photography is part of daily life for many people in the United States. Most of us carry a powerful phone and tap the camera when a scene looks right.
Too often, users keep default settings and miss better results in low light. Taking several frames in a single moment raises the odds of a usable photo.
Good framing and steady focus cut down on editing later. Learn how light sources, exposure balance, and contrast shape mood and detail after dark.
Modern phones can capture color, texture, and motion if you use simple techniques. With the right approach you do not need pricey tools to improve your shots.
In short: capture multiple frames, watch your screen for focus and exposure, and align edges. This small change makes many night scenes feel intentional and professional.
Understanding the Challenges of Low Light Photography
When the sun goes down, phone sensors must fight for every photon to make a good picture. The technical limits of sensors and lenses shape what you can capture after dark. Quantity and quality of light determine whether a shot looks deliberate or accidental.
Physics of Light
Sensors need either more exposure time or higher gain to gather light. Longer exposure helps tone and texture but risks motion blur. Increasing gain brightens a photo but raises noise and reduces fine detail.
Study great examples, like Kote Puerto’s Unsplash work and Artbeat Studios’ printed camping scene, to see how technique lifts results from ordinary to gallery-grade.
Dynamic Range Limitations
High contrast from lamps and headlights often clips highlights while shadows lose detail. Mixed color temperatures confuse auto white balance on many phones.
- The sensor must collect more light or amplify the signal.
- Highlights can clip; shadows may vanish in complex scenes.
- Artificial light mixes challenge color fidelity on phones.
- Recognizing limits lets you plan instead of relying on auto settings.
- Adapting technique improves most low light results.
“The quantity and quality of light are the primary factors that determine whether night photos look professional.”
Optimizing Your Smartphone Settings for Nighttime
A few deliberate tweaks on your phone can rescue color and detail in dim scenes.
Shoot RAW when possible. RAW files keep shadow data and color information that phones usually compress. That extra data helps when you edit later.
Use the main lens for low light. The primary camera has the largest sensor and better light gathering than ultra-wide or telephoto options.
Try Pro or Manual settings to control ISO and shutter speed. Lower ISO reduces noise; a longer shutter brings more light but needs stability.
Lock focus before long exposures to stop the camera from hunting. Manually set white balance under tungsten or sodium-vapor lights for truer color.
- Night processing often stacks frames over several seconds, so keep the phone steady.
- Review the screen and available options to match settings to each scene.
- Practice these settings in different low light environments to learn how each choice affects final photos.
“Small choices in camera settings move you beyond full auto and give creative freedom.”
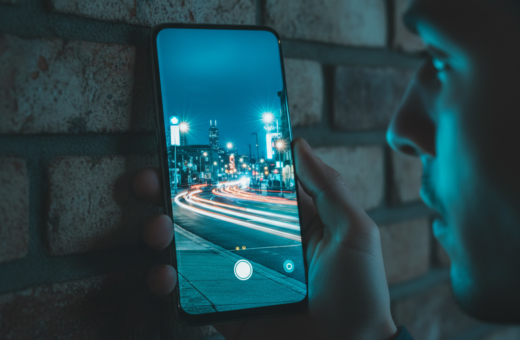
How Burst Mode Night Photography Smartphone Sharp Images Work
Taking a rapid run of frames gives you multiple chances to catch a perfect moment in low light.
How it works: the phone captures a quick sequence of shots when you hold the shutter. Each frame records a slightly different millisecond of motion, exposure, and focus.
Night mode often relies on multi-frame stacking. The phone aligns several frames over a few seconds to pull more detail from dim light. This is a form of rapid shooting that improves final quality.
- Holding the shutter produces many frames so you can pick the clearest photo.
- Moving subjects like people or pets are easier to catch because one frame may freeze the action.
- Each shot can have a different exposure; choosing the best reduces blur and noise.
- Mastering the timing of your press increases the chance of a successful image.
“By turning a single risky exposure into many short attempts, you make night shooting predictable and more productive.”
The Importance of Stabilization for Clearer Shots
Stable support is the single biggest boost you can give a low-light shot. When the shutter stays steady, your camera can use slower exposure seconds and lower gain to gather more light without extra noise.
Using Tripods
A small tripod or phone mount will instantly improve results. A secure mount unlocks longer exposures and cleaner photos from your phone.
Evgeniya Pron shows on Unsplash how steady setups preserve fine detail in dark scenes. For multi-second exposures, a tripod is the simplest upgrade you can make.
Improvised Stabilization
No tripod? Brace your phone against rocks, poles, or a backpack to reduce motion. Use a self-timer, a volume-button shutter, or a remote release to avoid tap-induced shake.
- Positional drift between frames blurs stacked shots and ruins composites.
- Even a tiny vibration during long exposure erases fine detail.
- Stability helps creative long exposures, like smoothing water or capturing light trails.
“Every moment you spend stabilizing your phone is an investment in the quality of your final night shots.”
Tip: Learn more in this image stabilization guide to match gear and technique to your shooting needs.
Mastering Exposure and ISO Balance
Mastering exposure and ISO puts you in control when light is scarce. Start by thinking in terms of trade-offs: lower ISO preserves color and detail, while longer shutter time brings more light but risks motion blur.
On many phones, keeping ISO between 400–800 yields the best mix of low noise and good tone. If possible, raise exposure time instead of gain and use a stable support to counter motion.
Slight underexposure is often safer than bright clipping. You can lift shadows in post, but you cannot recover blown streetlights or neon once highlights are clipped.
- Bracket exposures to create options for blending or picking the best shot.
- For moving subjects, choose a faster shutter to freeze motion or a slower one to record blur intentionally.
- Decide whether you want contrast or smooth tones; this guides whether to favor shutter, ISO, or both.
“Keeping ISO moderate and planning shutter choices is a core step to capture the night atmosphere.”
Vitalii Khodzinskyi’s Unsplash scenes illustrate that proper balance between ISO and shutter yields professional-looking results. Small, deliberate settings changes give you stronger color, controlled contrast, and usable frames every time.
Creative Use of Artificial and Ambient Light
Night scenes invite you to treat street lamps and neon as tools, not distractions. Christian Holzinger’s Unsplash shot shows how colored signs and lamps sculpt a scene.
Position your subject near a lamp, tent lantern, or campfire to add depth and separation. Side light brings texture; backlighting can create striking silhouettes.
Try light painting with a small flashlight during a long exposure to highlight foreground elements. Use a steady phone and brief, controlled strokes to avoid over-illumination.
- Reflections in wet streets and puddles multiply visual interest and color.
- Lower your viewpoint to compose reflections that echo the main scene.
- Combine burst and light painting to catch the best movement of a beam across a subject.
By observing how light hits your subject you move from documentation to creative work. These simple choices help your photos stand out in any phone or camera portfolio.
“Every moment you spend watching light is a chance to improve your creative photography skills.”
Framing and Composition for Night Scenes
A careful frame gives your shot purpose before you press the shutter.
Check the edges of your screen to avoid cutting important elements or letting distractions creep in. Small shifts in angle can remove unwanted light or stray objects.
Use your phone’s grid lines to keep horizons straight and to find balance. Place your main subject off-center for stronger composition and depth.
When you shoot a landscape, hold the device sideways to capture more space and detail. Focus on the subject and lock focus when possible to keep each frame usable.
- Think about how light sources shape your scene and add contrast.
- Use burst shooting to record multiple frames so you can pick the best composition later.
- Framing carefully reduces heavy edits and keeps final photos natural.
“Taking a moment to frame your shot properly is a key skill that separates amateur work from professional results.”
Editing Techniques for Vibrant Night Images
Post-processing is where your best low-light shots reach full potential. Start with targeted noise reduction to clean shadow areas but keep edges and highlights intact.
Sequence the work: reduce noise first, then restore micro-contrast so the result avoids a plasticky look. Correct white balance next to tame strong color casts while preserving mood.
Use selective masks or brush tools to apply edits only where needed. This keeps fine detail in lit areas and improves overall sharpness without over-smoothing.
- أخٌفيالله’s Unsplash shot shows how careful edits keep a scene vibrant.
- Prefer gentle brightness and contrast tweaks; avoid extreme color shifts.
- Export a high-quality TIFF or max-resolution JPEG so prints last for years.
“Proper editing completes the chain from capture to output, ensuring work looks professional and polished.”
Check results on a calibrated screen when possible. Try different options in trusted apps and tools to find the technique that best preserves color and detail in your photos.
Common Mistakes to Avoid After Dark
Common errors after dark often cost you the best shots before you even look at the screen. Finn’s Unsplash scene is a good reminder: auto settings can overexpose highlights and add heavy processing artifacts.
Learn a couple of manual adjustments to rescue difficult scenes. In low light, small changes to exposure and white balance often fix problems that auto cannot.
Use the main lens rather than an ultra-wide or digital zoom. The wrong lens can reduce detail and produce noticeable blur in dark areas.
- Don’t rush: take time to frame the moment before you press the shutter.
- If your phone warns about motion, stabilize to avoid blur and wasted shots.
- Avoid over-editing; extreme sharpening or heavy saturation creates halos and fake tones.
- Night mode is useful, but know when to override it with manual settings to control exposure.
- Always prioritize safety on location; slippery or unfamiliar terrain adds real risk during shooting.
“Every moment you spend planning your shoot helps you avoid common mistakes and capture better low light work.”
Conclusion
Intentional choices about light, support, and timing change ordinary evening captures into memorable photos.
Focus on craft, not gear: Billy Xue’s Unsplash work shows how careful technique leads to striking results. Francisco de Frias’s FAQ offers clear tips on reducing noise and using manual controls.
Practice the methods here — try quick multi-frame bursts, stabilize the phone, and tweak exposure. One well-executed frame beats a dozen mediocre attempts.
Turn your work into art: learn basic color management and invest in a good printer to make prints that last. Go out, experiment, and enjoy using the dark as a creative toolkit.